Happy Friday, friends! I hope your week was amazing and hopefully you have some fun ahead for the weekend!
I'm a huge advocate of brand consistency because in a sea of similarity you want to stand out. The easiest way to stand out is to keep your branding consistent. Today I'm bringing you some creative tech training that will help you to implement something new on your website that will instantly bring your website's status up.

Have you heard of a Favicon? It's the little icon that sits in the address bar next to a site's name and also in the bookmark list. This is mine:

It's quite easy to make one of these, and having one makes your website a little more official. The standard size is 16px x 16px (px means pixels by the way), and since the size is so small, it's best to create something that has minimal details and uses contrasting colors so that it pops out. Think of something like a shape, one letter, or a SIMPLE line drawing.
If you use design software (Illustrator, Photoshop, etc.), create a new file sized at 16px x 16px, create your design, then save it as a .png file (if you're using Photoshop, you can save the file as a .ico file by selecting png for the file type, but in the file name type the .ico extension at the end).
If you do not use design software, you can use my favorite go-to free program that I use on the go, Canva. This training will cover how to create a simple favicon with one piece of text and a solid colored background.
1. Create a new document using custom dimensions (40px x 40px- the standard dimensions of a favicon are 16px x 16px but Canva's smallest size allowed is 40px, that's why we are using 40px here)


Tip: Since the box that appears is so small, click "Command +" on a Mac or "Ctrl +" on a PC on the keyboard a few times to zoom into the work area.
2. Click "Elements" in the sidebar then click "Shapes".

3. Select the first square option that is listed, then click the circle that appears in the toolbox to change the color of the box (you can enter the custom color code that you use for your branding!).
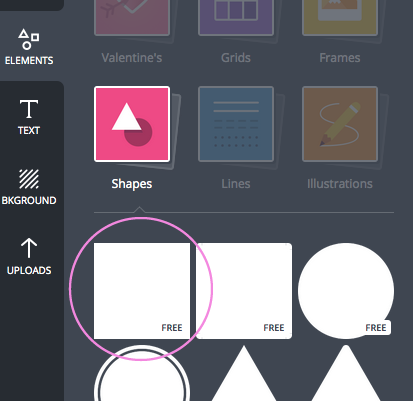


Tip: There is a white margin around the square. Resize the square by clicking it and dragging the circles on the corners of the box to cover the white margin.


4. Next, click "Text" in the sidebar then click "Add a little bit of body text".

5. Overwrite the default text with one letter.


6. Choose the font that you use as a part of your brand from the text dropdown list. If your font is not an option, choose the font that looks most similar to it.


7. Change the color of the letter to one of your brand colors from the toolbox (you can enter the custom color code that you use for your branding!).


8. Re-size the letter to your liking by changing the font size.

9. Center the text inside of the box by clicking the dotted line above the letter and drag it up (a four pointed arrow will appear meaning that you will be moving the letter).


10. Once you have created a favicon that you love, download the file by clicking "Download" at the top, then choose "Image: high quality (PNG)" for the file type. The file will be saved in your Downloads folder or you will be prompted to save it in a folder of your choice. I suggest moving/saving the file to a folder on your computer that you keep all of your branding files in.

Note: Internet Explorer doesn't support the .png format for favicons, so if you want your favicon to appear in all web browsers, you can make a copy of the .png file then change the extension to .ico so that you have both file type options. This is a personal preference...some people don't prefer internet explorer and are unbothered by this limitation.
Next we will be uploading the favicon to your website. There are various ways to do this, but I will cover the two ways that I have hands on experience with.
SquareSpace:
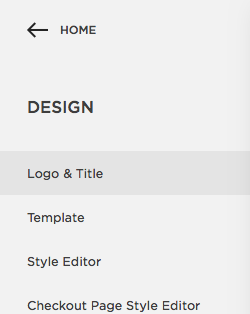
1. Click "Design" in your main screen

2. Click "Logo & Title"
3. Scroll down to the "Browser Icon (Favicon)" section, then upload your .png (or .ico) file by clicking "Add a favicon".

4. Save the settings once it's uploaded (it will look blurry because it is being shown at a larger size than it really is, but it will appear properly in your address bar).

5. If after saving you do not see the favicon appear in your address bar, close all of your internet windows and open a brand new session, go to your URL and it should appear.

Blogger:
1. From your Blogger dashboard, click the blog that you want to add the favicon to then click "Layout" in the sidebar.

2. Click "Edit" where the favicon box appears, choose your .png (or .ico) file then save.


3. Save the arrangement at the top right of the screen.

4. If after saving you do not see the favicon appear in your address bar, close all of your internet windows and open a brand new session, go to your URL and it should appear.
Now that the weekend is almost here, try this out! I would love to see your designs. Leave a comment with your url so that I can check them out!
Enjoy the weekend!