1 Genius Item To Keep With You At All Times For Mobile Photography

Today I'm excited to share one super easy, super quick tip that will change the way you take photos on your phone!  Mobile Photography is essentially micro photography, so thinking about it in that sense you will want to use common photo equipment in a portable, micro form.  For example, you can use a small flashlight to add extra lighting to a dark image without using the dreaded flash.  The flashlight would take the place of a bulky lighting kit.  Even better than that, there is one genius thing that you can do that will solve a common photography problem and make your images look more appealing.

Keep a piece of white paper with you and use it as a source to create fill light!  Often times when you are taking photos there can be either extreme highlights or harsh shadows.  You can get rid of them by holding a piece of white paper next to the object being photographed and the light will reflect off of the paper back onto the object and "fill" in the dark/light areas.  This is actually a photography technique, but is usually achieved by using Board Reflectors.  They're quite large though, and who is going to carry one of these boards around with them all of the time?  If you just make sure that you always have a piece of white paper with you, you can achieve the same result.  Lets take a look at this in action.  As a note, I didn't apply filters to these images, they were taken straight from my phone so that you can see the raw image with only the help of the fill light.

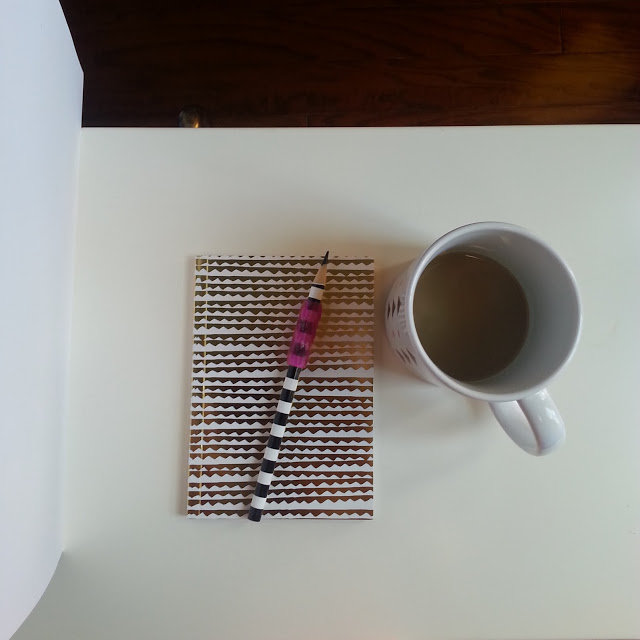
This image was taken without fill light from the piece of paper-

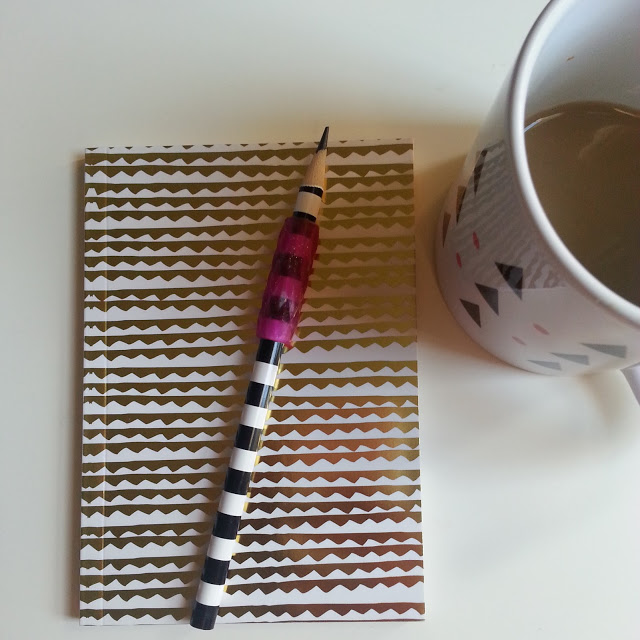
See how dark the image is, especially around the top and middle?  It needs a more even distribution of light, and the shadow on the mug is just gross.

This image was taken with fill light from a piece of paper held up on the left side.

The image is brighter overall and the shadows have decreased!  The mug looks so much better and you can see more of the pencil.

Here are the same images side by side-

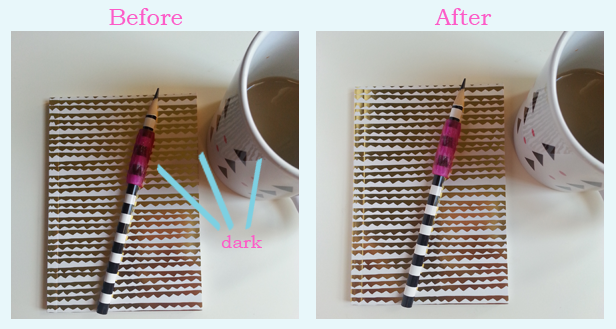
This is my setup to achieve the shot-

Super easy!  A rule of thumb is to hold the paper up across from the light source, so if the sun is shining in from the right, hold the paper up on the left.  Depending on your light source and the look that you want to achieve, you may want to move the paper to a different location, so just play around with it until you get the results that you want!

Bonus Tip: You can use another piece of paper on the other side of the object to create fill light from both sides.  This will brighten up the image even more and may require less post-photo edits which is what I'm all about!  How will this decrease post-photo edits you ask?  The light will be more evenly distributed across the scene which means you won't have to adjust highlights and shadows as much, just the overall exposure and contrast if needed.

Extra Bonus Tip: Don't have a piece of white paper handy?  You can use a thick napkin or any other white object as long as it is large enough to bounce light off of.

I hope this tip will be useful for you and your mobile photography!  If you liked this tip, tweet it out!


5 New Year's Resolutions For Your Blog/Biz + A Freebie

Happy New Year, friends!  I'm so pumped for the year ahead and for the exciting things that will be taking place in Color Hug land!

The new year is all about changes and crafting a better situation for yourself.  This is great, but how about setting New Year's Resolutions for your business as well?  To get you started, I have compiled a list of 5 resolutions that you can and should implement into your blog/biz structure.

1. Schedule time to celebrate your wins- Celebrating milestones and goals that are met in your blog/biz is a must!  All of the hard work that you're putting in should be rewarded.  Often times knowing there is a celebration at the end makes us work even harder to get there.  These celebrations don't have to be a full on party (unless that's your thing, then party on!), but they can be as simple as buying a nice bottle of champagne to enjoy, getting a massage, treating yourself to a gourmet dessert, etc.  You should take this seriously and actually add it to your calendar...even create a reminder so that there are no excuses.

2. Delegate certain tasks to robots- I spoke of automation before, and I will speak on it again because I am so passionate about it!  Set up a few tasks for automation so that you will have more time to work on other things.  You can easily set up a multitude of automated tasks using Zapier.  For example, you can create "Zaps" that save new twitter followers to a google spreadsheet, post the actual image that you posted to Instagram to your twitter account (not just the link to image, the ACTUAL image!), save your favorited tweets to Evernote, etc.  The possibilities are nearly endless!

3. Rent a P.O. Box- If you are performing any type of business function that requires an address, you definitely do not want to use your home address.  One obvious reason is safety...people can be crazy these days!  Also, you want to appear a little more professional and using a home address doesn't cut it.  There is now an option to use an actual street address and suite number instead of using "PO Box".  There is no extra charge to do this.  You can rent a PO Box for a small cost (I pay $60 a year).  Don't forget, this is a business expense, so include this on your Schedule C!

Tip: Do not rent a large box!  Rent the smallest (i.e. cheapest) box and if you happen to receive a shipment that won't fit, the package will be available to pick up from the counter.

4. Create filters/rules in your email that will organize emails upon arrival- This has been a beautiful thing for me and my inbox.  Email rules are one of those things that makes you want to give a hug to the person who thought of it.  I mean seriously, sometimes I just look at my inbox and watch emails move to where they need to go and I smile because I didn't have to stop what I was doing to move it (or even delete it if you have that rule set up!).  I urge you to create rules because they can organize your inbox and cause you less stress (the number of new messages in the inbox will be lower as a result of the rules).

5. Work Backwards- Really get organized by setting up realistic business goals for the year on a realistic timeline.  As creatives, we tend to constantly come up with new ideas for products, services, blog posts, collaborations, brand design updates, etc.  Oftentimes the list of things to accomplish becomes so large and overwhelming it tends to make us want to give up before we even begin.  Your to-do list shouldn't be discouraging, but instead exciting!  You should be pumped every time you look at it.  If you're not pumped, it's because you're likely overloading yourself or your blog/biz is on a subject matter that you aren't truly interested in.  So instead of organizing your business in a fake way (ex: buying cute products to store office supplies that you frequently use so that your desk can be clean, beautiful and Instagram ready), organize it in a streamlined way.  This means imagine your business this time next year.  What do you see?  What steps will it take to get there?  Work backwards until you get to today and you have your year's worth of accomplishments.  From there, you should space things out accordingly to work on, so don't try to pack too much together.  A good rule of thumb is to plan out 3-4 large accomplishments for the year each to be completed quarterly, then the time in between will be filled with the steps to complete them.  This strategy prevents overload because you're not working on large projects simultaneously.

To jump start your organization for the year, I have designed for you a weekly planning sheet that can be used either by printing and writing on it or by adding your tasks to the pdf directly.  I have even included a section for your social media so you can determine what and where you want to post each day.  The phrase "Think it. Plan it. Do it." is at the top of the sheet because every great thing was first a thought, then a plan of action was created then the process was executed!

Click the button below to get your FREE weekly planner sheet as well as access to various free checklists, guides and worksheets for bloggers and creatives!