I always speak about the importance of focusing on platforms that you own and have greater control over such as your website and email list. This means don’t let the main focus of your business be on social media. Social media platforms hold all of your followers and content that you have posted, and if they shut down all of your followers and content shuts down right along with it. This is the main reason you should be putting more of your effort into your email list and website contents. With an email list, you can save all direct contact details with a simple export, that way, if your email marketing platform shuts down you still have all of your email contacts. You can also back up contents of your website so if your website provider shuts down, you will still have your content.
BUT...and there’s a big but here...let's be real...social media, specifically Instagram, is still SO important to incorporate into your marketing strategy! It’s a free marketing tool where your target audience likely resides meaning you can actually be social and show your human side, it’s easier to keep up to date than a website, it can reach so many more eyes, and the different types of video content that you can post makes it a great all-in-one app. With all the benefits of Instagram, a great way to approach it is by following a streamlined workflow for it as well. You can easily do this by using feed planning apps. Today I will be talking about the benefits of planning your feed with my favorite app, Preview.

Feed planning apps are used to plan your Instagram feed in advance so you can get an idea of how the aesthetic will be and you can also tailor the message and content that you want to share and promote (i.e. have a method behind the madness!). Here are some benefits of planning your feed in advance:
You can knock out a chunk of content planning in one sitting.
You won’t have to stress over what to post in real time.
You can view how your feed will look if you are trying to stick to a specific aesthetic.
There are various feed planning apps out there such as Planoly and UNUM, however, I have found that the Preview app works seamlessly with my Instagram feed planning process. The main reason is because you can edit your photos directly in the app, so there is no need to edit in a separate app then import it to the feed planner. You know I love a good, simplified process so an all in one app is ideal! The preview editor includes options for cropping, red eye removal, whitening, removing blemishes, and of course editing photos (brightness, contrast, saturation, etc.). There are also filters in the app for use, both free and paid. Currently I am on the free plan, but the free plan includes a large amount of features.
Now that you know why Preview is my preferred Instagram feed planning app of choice, lets get into how this awesome app works!
How to use the Preview App
Importing to the Grid
The first thing is that you will import your photos to the grid by clicking the + sign in the top right corner. Once your photos are in the grid, you can click and drag them to the preferred location. This is the main function of the app. You can import multiple photos and videos at a time.

Editing Photos
To edit a photo, double click it from the grid. You will then see various editing features. You can click either the Adjust icon or the Filters icon.
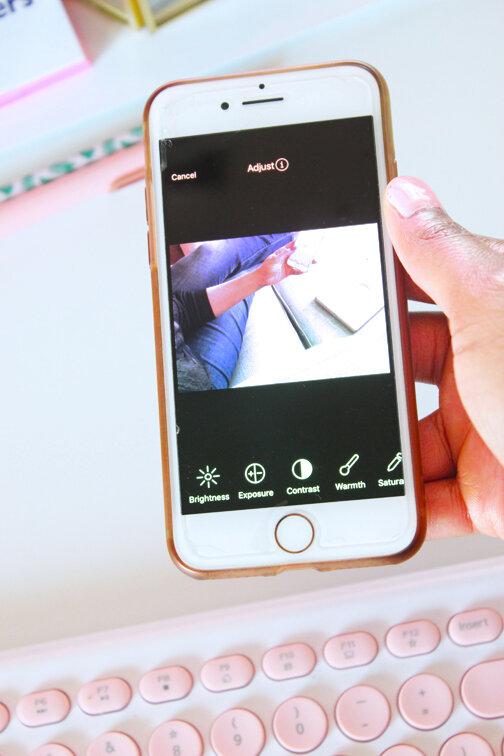
Adjust
This is where you will manually adjust the photo with options such as Exposure, Contrast, Warmth, etc.
Filters
This is where you can select a preexisting filter. These are great for when you want to have a specific look for all of your photos.
Adding a Photo Description
You can add the description for your photo directly in the app by clicking the quote bubble at the bottom of the app from the main grid screen. This is great because you can really think about what you want to say and plan it out, so you will not have to think of it on the fly while trying to post to Instagram spontaneously. This helps you to have a more clear, and well thought out message.

Hashtags
You can also create hashtag groups in the app and add them to the description. This is a good feature, however, I prefer to use the text replacement native iPhone feature to make my own hashtag groups that don’t have to be married to an app. I created a Reel on how to set up this time-saving feature- check it out here.
Scheduling Your Posts
A few days ago, Preview announced that you can auto post to Instagram now. This is a paid feature, however. If you use a free account, you can still schedule a push reminder for when it’s time for you to post to Instagram. This is done in the description page by toggling the “Schedule Post” button on, then you will select the day and time to receive the post reminder.
If you really want to schedule your post to automatically post to Instagram but don’t have a paid account, you can export the completed photo to another app such as Buffer, add it to your Buffer queue, add the description and schedule it as normal. As a reminder, you must have a Business Instagram account to post automatically to Instagram from third-party apps.
Posting to Instagram
When you are ready to manually post your photo to Instagram, click the image then the Share icon. You will be asked how you want to share the image, then select whether you want to share it to your Stories or your Feed. Your caption is also copied at that point, so when Instagram opens, you can paste it right into the description!
Extra Features
Planning Reels
You can now plan your Reels in Preview, so this further helps to streamline your content creation process. You can plan the photos/videos out, then export to Instagram the same as you would with a feed post.
Another note about Reels that are posted to your Instagram feed- since Reels aren’t considered actual posts on your feed, they do not automatically appear in your Preview grid for previously posted content. There is a way to pull these into Preview though! You would do this through the Placeholder feature. When you click the + icon to add a photo to your grid, there is a “Placeholder” option which you will select. Preview will then direct you through what to do, but you essentially open the Reel then copy the link to that Reel, and it will magically be added to your Preview feed!
Planning Stories
You can also plan your Instagram Stories in Preview. This is incredibly helpful for when you have a lot of content to post and don’t want to do it directly in Instagram with the risk of losing your content before it has posted (no option for Story drafts in Instagram!).
Note: The Reels and Stories planning icons are at the top of the main app grid, so it makes it easy to know what section you are currently planning.
This is only touching the surface of what can be done in the Preview app, but these are my go-to features. As I mentioned before, there is a free version and two paid versions (Pro and Premium). Of course the paid versions grants access to things like:
All filter packs
IGTV planning
Removing Preview tags from caption
Post Analytics
Hashtag Finder
Hashtag Analytics
...much more
Do you use Instagram feed planning apps? I’d love to hear about them- leave a comment below!